Subaru Forester: Remote keyless entry system

- Do not expose the remote transmitter to severe shocks, such as those experienced as a result of dropping or throwing.
- Do not take the remote transmitter apart except when replacing the battery.
- Do not get the remote transmitter wet. If it gets wet, wipe it dry with a cloth immediately.
- When you carry the remote transmitter on an airplane, do not press the button of the remote transmitter while in the airplane.
When any button of the remote transmitter is pressed, radio waves are sent and may affect the operation of the airplane.
When you carry the remote transmitter in a bag on an airplane, take measures to prevent the buttons of the remote transmitter from being pressed.
- FCC WARNING
Changes or modifications not
expressly approved by the party
responsible for compliance
could void the user’s authority
to operate the equipment.
This device complies with Part 15 of the FCC Rules and RSS-Gen of IC Rules. Operation is subject to the following two conditions: (1) this device may not cause harmful interference, and (2) this device must accept any interference received, including interference that may cause undesired operation.
Two transmitters are provided for your vehicle.
The keyless entry system has the following functions.
- Locking and unlocking the doors and
rear gate without a key
- Unlocking the rear gate without a key
- Sounding a panic alarm
- Arming and disarming the alarm system.
For detailed information, refer to “Alarm system”.
The operable distance of the keyless entry system is approximately 30 feet (10 meters). However, this distance will vary depending on environmental conditions.
The system’s operable distance will be shorter in areas near a facility or electronic equipment emitting strong radio waves such as a power plant, broadcast station, TV tower, or remote controller of home electronic appliances.
The keyless entry system does not operate when the key is inserted in the ignition switch.
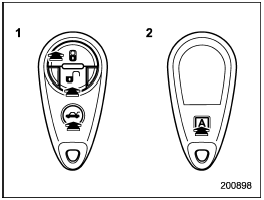
 : Rear gate unlock button
 : Unlock/disarm button
 : Lock/arm button
A: Panic button
1) Front
2) Back
Locking the doors
Locking the doors
Press the “” button to lock all
doors and
the rear gate. An electronic chirp will
sound once and the turn signal lights will
flash once.
If any of the doors or the rear gate is not fully closed, an electronic chirp will sound five times and the turn signal lights will flash five times to alert you that the doors or the rear gate are not properly closed.
When you close the door, it will automatically lock and then an electronic chirp will sound once and the turn signal lights will flash once.
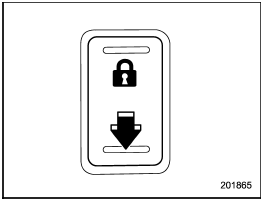
Unlocking the doors

Unlocking the doors
Press the “” button to unlock
the driver’s
door. An electronic chirp will sound twice
and the turn signal lights will flash twice.
To unlock all doors and the rear gate,
briefly press the “” button a
second time
within 5 seconds.
NOTE
If the interval between the first and
second presses of the “”
button (for
unlocking of all of the doors and the
rear gate) is extremely short, the system
may not respond.
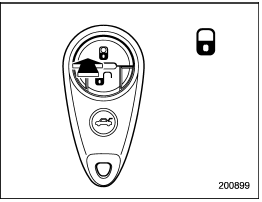
Unlocking the rear gate
Unlocking the rear gate
Pressing the “” button unlocks
the rear
gate.
An electronic chirp will sound twice and the turn signal lights will flash twice.
Illuminated entry
The interior (dome) light and the map light
will illuminate when the “![]() ”
button is
pressed. These lights stay illuminated for
approximately 30 seconds if any of the
doors or the rear gate is not opened.
”
button is
pressed. These lights stay illuminated for
approximately 30 seconds if any of the
doors or the rear gate is not opened.
If the “” button is pressed before
30
seconds have elapsed, these lights will
turn off. The lights must be set to the
DOOR position in order for this function
to operate.
A SUBARU dealer can change the illumination period setting of the interior light in accordance with your preference. Contact the nearest SUBARU dealer for details.
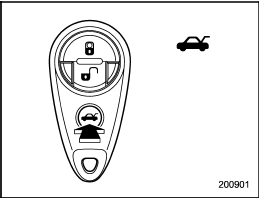
Vehicle finder function
Use this function to find your vehicle
parked among many vehicles in a large
parking lot. Provided you are within 30 feet
(10 meters) of the vehicle, pressing the “”
button three times in a 5-second period
will cause your vehicle’s horn to sound
once and its turn signal lights to flash three
times.
NOTE
If the interval between presses is too
short when you press the “”
button
three times, the system may not respond
to the signals from the remote
transmitter.
Sounding a panic alarm
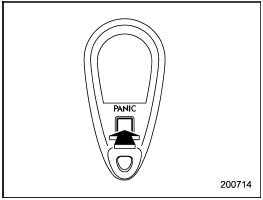
Sounding a panic alarm
A “PANIC” button is located on the back of the transmitter.
To activate the alarm, press the “PANIC” button once.
The horn will sound and the turn signal lights will flash.
To deactivate the panic alarm, press any button on the remote transmitter. Unless a button on the remote is pressed, the alarm will be deactivated after approximately 30 seconds.
Selecting turn signal lights operation
When the remote keyless entry system is used, the turn signal lights flash. However, the turn signal lights flashing operational non-operational setting can be changed.
Models with genuine SUBARU navigation system:
The setting can be changed using the navigation monitor. For details, refer to the Owner’s Manual Supplement for the navigation system.
Models without genuine SUBARU navigation system:
The setting can be changed by your SUBARU dealer. Contact your SUBARU dealer for details.
Selecting audible signal operation
Using an electronic chirp, the system will give you an audible signal when the doors lock and unlock. If desired, you may turn the audible signal off.
Do the following to deactivate the audible signal. You can also use the same steps to restore the function.
1. Sit in the driver’s seat and shut all doors and the rear gate.
2. Hold down the UNLOCK side of the power door locking switch.
3. While holding down the “UNLOCK” side of the power door locking switch, pull the key out and re-insert it into the ignition switch at least 6 times within 10 seconds after step 2.
4. Open and close the driver’s door once within 10 seconds after step 3.
5. The turn signal lights flash 3 times to indicate completion of the setting.
You may have the above settings done by your SUBARU dealer. Contact your SUBARU dealer for details. For models with a genuine SUBARU navigation system, the settings can be changed using the navigation monitor. For details, refer to the Owner’s Manual Supplement for the navigation system.
Replacing the battery
- Do not let dust, oil or water get on or in the transmitter when replacing the battery.
- Be careful not to damage the printed circuit board in the transmitter when replacing the battery.
- Be careful not to allow children to touch the battery and any removed parts; children could swallow them.
- There is a danger of explosion if an incorrect replacement battery is used. Replace only with the same or equivalent type of bat- tery.
- Batteries should not be exposed to excessive heat such as sunshine, fire or the like.
When the transmitter battery begins to get weak, transmitter range will begin to decrease. Replace the battery as soon as possible.
To replace the battery:
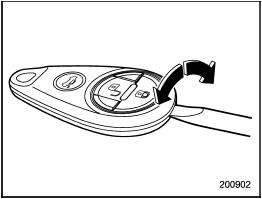
1. Open the transmitter case using a flathead screwdriver.
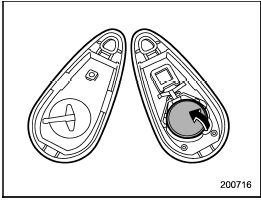
2. Remove the old battery from the holder.
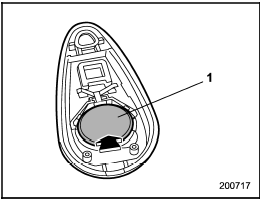
1) Negative (−) side facing up
3. Replace with a new battery (type CR2025 or equivalent) making sure to install the new battery with the negative (−) side facing up.
4. Refit the removed half of the transmitter case.
After the battery is replaced, the transmitter must be synchronized with the keyless entry system’s control unit.
Press either the “” or “![]() ”
button six
times to synchronize the unit.
”
button six
times to synchronize the unit.
Replacing lost transmitters
If you lose a transmitter or want to purchase additional transmitters (up to four can be programmed), you should reprogram all of your transmitters for security reasons. It is recommended that you have your dealer program all of your transmitters into your system.
Programming the transmitters
The keyless entry system is equipped with a special code learning feature that allows you to program new transmitter codes into the system or to delete old ones. The system can learn up to four unique transmitter codes. The four transmitter codes may be the same or different.
Programming transmitter codes into system:
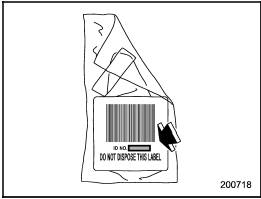
Bag containing transmitter
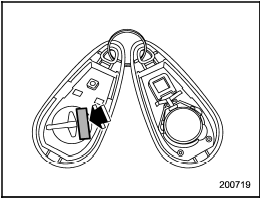
Transmitter circuit board
To register a new transmitter with the
keyless entry system, it is necessary to
program the transmitter’s code (identification
number) into the system. A label
showing the code is affixed to the bag
containing the transmitter, and another is
affixed to the circuit board inside the
transmitter. If there is no bag, open the
transmitter case and make a note of the
eight-digit number. Program the number
into the system in accordance with the
following procedure:
1. Firmly close the doors and the rear
gate.
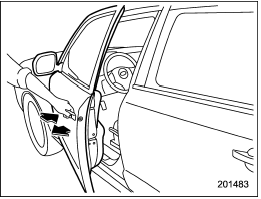
2. Open the driver’s door, sit on the driver’s seat, and close the door.
3. Perform the following steps within 45 seconds.
(1) Open and close the driver’s door once.
1) ON
2) LOCK
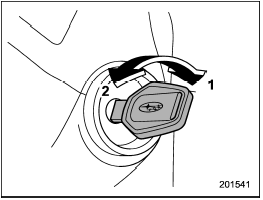
(2) Insert the key into the ignition switch, then turn it from the “LOCK” position to the “ON” position 10 times within 15 seconds.
NOTE
- When you complete step (2), an
electronic tone will sound once.
- If you do not perform steps (1) and (2) within 45 seconds, an error will occur. Neither an electronic tone nor the buzzer will sound, and the interior lamp will not flash. In this event, perform the whole procedure again beginning with part 1.
4. Open and close the door once within 15 seconds.
NOTE
- When part 4 of the procedure is
completed, an electronic tone will
sound for 30 seconds.
- If you do not perform the operations in part 4 within 15 seconds, an error will occur and the electronic tone will not sound. In this event, perform the registration steps again beginning with part 3 of the procedure.
5. Before the electronic tone stops sounding, push the lock side of the power door lock switch the same number of times as the leftmost digit of the transmitter code. For example, push the lock switch eight times if the leftmost digit of the code is 8.
NOTE
- The electronic tone will stop sounding
when you start entering the number.
- If you do not start entering the number using the lock switch before the electronic tone stops sounding, an error will occur. In this event, perform the registration steps again beginning with part 3 of the procedure.
- If the interval between one push of the switch and the next exceeds 5 seconds, an error will occur. In this event, perform the procedure again beginning with part 4. If an error occurs six times, perform the procedure again starting with part 3.
6. When you have finished entering the number, push the unlock side of the lock switch within 5 seconds.
NOTE
- An electronic tone will sound.
- If you push the unlock side of the lock switch when more than 5 seconds have passed, an error will occur. In this event, perform the procedure again beginning with part 4. If an error occurs six times, perform the procedure again starting with part 3.
7. Perform parts 5 and 6 of the procedure for each of the remaining digits of the transmitter code beginning with the second digit (counting from the left) and finishing with the eighth digit.
NOTE
- When you finish entering the eighth
digit, an electronic tone will sound for
30 seconds.
- If the interval between one push of the switch and the next exceeds 5 seconds, an error will occur. In this event, perform the procedure again beginning with part 4. If an error occurs six times, perform the procedure again starting with part 3.
8. Before the electronic tone stops sounding, use the power door lock switch to reenter the transmitter code beginning with the leftmost digit.
NOTE
If you do not start entering the number
using the lock switch before the electronic
tone stops sounding, an error
will occur. In this event, perform the
procedure again beginning with part 3.
9. When you have finished entering the code a second time, an electronic tone will sound for 1 second and automatic door locking and unlocking operation will take place once to indicate completion of registration, provided the code entered the second time is identical to that entered the first time.
NOTE
If the code entered the second time is
not identical to the code entered the
first time, an error will occur. In this
event, perform the procedure again
beginning with part 5. If an error occurs
five times, perform the procedure again
starting with part 3.
10. If you wish to program another transmitter code into the system (up to four transmitter codes can be programmed into the system), perform the procedure beginning with part 4. When you have finished programming all of the necessary transmitter codes into the system, remove the key from the ignition switch.
11. Test every registered transmitter to confirm correct operation.
Deleting old transmitter codes
The control unit of the keyless entry system has four memory locations to store transmitter codes, giving it the ability to operate with up to four transmitters. When you lose a transmitter, the lost transmitter’s code remains in the memory. For security reasons, lost transmitter codes should be deleted from the memory.
To delete old transmitter codes, program four transmitter codes into the system. If you have only one current transmitter, program it four times. If you have two current transmitters, program each one twice. If you have three current transmitters, program two of them once and the third one twice. This process will leave only current transmitter codes in the system’s memory.
NOTE
Make sure no one else is operating
their keyless entry system within range
of your vehicle when programming
transmitters. If someone else were to
operate their remote transmitter while
you are programming your transmitters,
it is possible that their transmitter
code will be programmed into your
system, allowing them unauthorized
access to your vehicle.
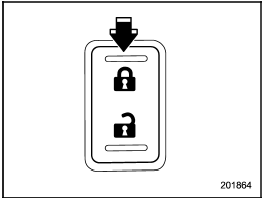
 Power door locking switches
See also:
Glossary of tire terminology
Terms
The tire suppliers may have additional markings,
notes or warnings such as standard load,
radial tubeless, etc.
• Tire information placard: A placard
showing the OE (Original Equipment) tire
sizes, recommended inflation pressure,
...
Filling the fuel tank
WARNING:
● When handling fuel, comply with the safety regulations displayed by garages and
filling stations.
● Before removing the fuel cap, be sure to get rid of your body’s static electricity
by touching a metal part of the ca ...
